7 Macro Photo Subjects to Shoot in Winter

All of the four seasons have their own individual character. As one season gives way to the next, fresh photographic opportunities abound – don’t miss them!
Winter boasts a whole host of seasonal delights, some obvious, others less so. Wintry weather will transform the landscape, with frost and snow capable of enhancing everyday objects that we might otherwise overlook.


Close-up enthusiasts can highlight seasonal beauty, focusing on the detail and patterns created by freezing weather, and capturing frame-filling shots using a macro lens or close-up attachment.
In the right conditions, you may not need to venture any further than your own back garden or local park to capture extraordinary close-up images. The light remains good throughout the day and, if you are wrapped up warm, this can be an enjoyable and productive time of year for macro photography.
In need of further inspiration? Read on!
1. Ice patterns
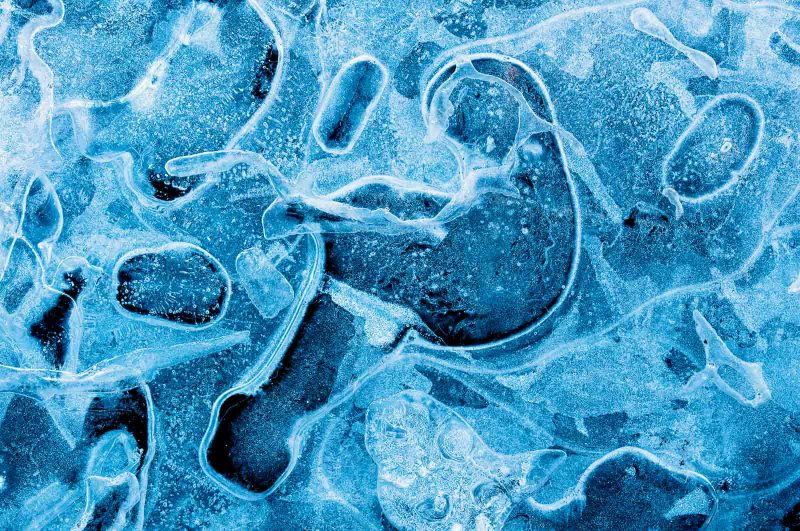
During the big freeze, pools, puddles, and ponds will turn to ice. Look along the edges of local streams and cascades and you will find photogenic icicles and ice-encrusted foliage, created by frozen spray. Ice provides so many opportunities for close-up photographers to capture intriguing, beautiful, and abstract looking shots.

Days of freezing weather will create deep layers of ice. The trapped air bubbles, cracks, and creases will result in wavy patterns, swirls, and lines. An overhead view is often best for revealing these patterns, but be careful not to crack the ice when placing tripod legs. A cool blue colour temperature – in the region of 4000-4500k – will enhance the coldness of the ice.
Study frozen water for the most interesting areas of detail and then highlight them by cropping in tight and filling the frame. When photographing ice patterns on larger bodies of water, keep to the edges for safety. Do not risk either you or your kit taking a plunge.
2. Frost
In freezing conditions, wrap up well and head out with your close focusing lens. Frost will decorate plants, leaves, and grasses with a thin layer of tiny ice crystals, highlighting the subject’s shape and form. Set your alarm early, as frost can thaw and vanish quickly once the sun has risen, and it will glisten and sparkle in low, warm sunlight.
Open spaces will be affected most by the cold, so avoid sheltered areas. Look closely at subjects in your back garden, for example spider webs, fallen leaves, and intricate patterns created by frost on manmade subjects, like glass and metal.

In really cold conditions, visit nearby coastlines. Pebbles and seaweed will be frozen and their texture highlighted by frost. In close-up, you can reveal every ice crystal encrusting your subject. Overcast light often suits frost, although sidelight will add depth and sparkle to close-ups.
Consider selecting a cooler white balance, either in-camera or during editing, in order to help enhance the feeling of coldness. Use a tripod for stability and to aid precise focus. Remember, depth of field is wafer thin at higher magnifications.
3. Bark
Many close-up subjects are not immediately obvious. One of the key skills for macro enthusiasts is the ability to recognise interesting miniature detail or texture that, once isolated, will create a compelling composition.
Bark can be smooth and glossy, or rough and textured: a creative eye is essential to ‘see’ the shot. Tree bark might not sound like an exciting subject, but it can be tactile, textured, and provide beautiful patterns.
Start by studying the trees in your garden, or a nearby park or woodland. Better still, visit a local arboretum, which will be home to a more varied and interesting selection of trees.

To highlight texture, shoot from an angle perpendicular to the tree. Alternatively, to highlight patterns and colour, a parallel viewpoint is best. Again, fill the frame for the most abstract results. A small aperture, in the region of f/11 or f/16, will generate a large enough depth of field to record everything sharply.
Young trees can prove trickier to shoot, as their narrower trunk will curve away from the centre of the image, and potentially drift out of focus. The best shots often boast repetition or interesting shapes. Low contrast light is often the most flattering.
Read more: How to Photograph Trees and Forests
4. Moss and lichen
Moss and lichen grow almost everywhere: gardens, old stone walls, woodland, and churchyards are all good places to look. They might be subjects you would overlook at other times of the year, when there are more obvious close-up subjects like flowers and insects.
However, a macro lens can transform the ordinary into the extraordinary and, once you get up close and personal with these tiny plants, you will soon recognise their picture potential. Both are slow growing plants that cling to rocks, trees, or the ground. They can create stunning natural patterns, and your job is to identify and isolate them with your camera.

Many species are at their best during the winter, producing interesting fruiting bodies and spore capsules that add further interest. To produce edge-to-edge sharpness, select a small aperture and keep your camera parallel to the surface on which the plant is growing.
By doing so, you will place as much of the subject as possible within the plane of focus. Mosses often grow in dark places, so ideally use a tripod as shutter speeds may be slow. Also, trigger the shutter remotely, so you don’t create any camera motion.
5. Snowdrops
It might be winter, but that doesn’t mean your garden is devoid of life. Snowdrops, which have a distinctive, single white nodding flower, carried on a single stem, are one of the first flowers to bloom, often poking their way through frosted soil or snow.
If they don’t appear in your back garden, try visiting local woodland, a public garden, or an old churchyard. They can grow is small clumps or vast carpets. Some stately homes host snowdrop walks to show off their annual display.
You can use a wide-angle lens to show them in context with their surroundings, but I favour a closer approach.

Use a macro lens or close-up attachment to isolate just one or two flowers. A low shooting angle is typically best. Lay prone to achieve a natural viewpoint, but be careful not to flatten or damage nearby blooms.
A tripod can prove impractical for shooting a ground level perspective. Instead, try using a beanbag to support your set-up. Explore different angles and approaches. Try shooting in early morning or late evening, when the light is lower and more atmospheric.

As snowdrops are so distinctive, try shooting into the light to silhouette your subject. Alternatively, use your camera’s multiple exposure mode to create dreamy, soft-focus results. This is known as the ‘Orton Effect’. White flowers can fool TTL metering into underexposure, so look at the histogram and adjust exposure if required.
Read more: How to Photograph Snowdrops
6. Decay
Good close-up subjects don’t always have to be natural. Manmade objects, found indoors or out, can be great providers of textures, patterns, shape, and form. They can be good subjects for honing close-up techniques and your understanding of light. Curiously, decay often proves to be a particularly good subject for close-up shooters.

Blistered paintwork, rusty chains and wire, and splintered glass are all examples of the types of objects that suit being shot in close-up. Such objects often look abstract when isolated. You may find subjects in your own backyard but, if not, old farm buildings and harbours are typically good sources of interest and colour.
Technically, subjects like this are relatively straightforward to shoot. Once again, the skill is visualising the shot in the first instance. To start with, study subjects through your close focusing lens, or even use your camera phone as a framing device. Once you have ‘found’ a composition, use a tripod to refine your shot.
7. Frogs
Visit a pond at this time of year and there appears to be little sign of life: it will be months before dragonflies, damselflies, and other aquatic life bring them alive again. However, in mild weather, frogs will emerge from their torpid state to return to local ponds to spawn.
In some parts of the UK, this might be as early as late December or January. If you have a wildlife pond in your garden, or have access to a pond or reserve close by, check regularly for frog activity. Where I live in Cornwall, it’s common for me to discover frog spawn in early January.
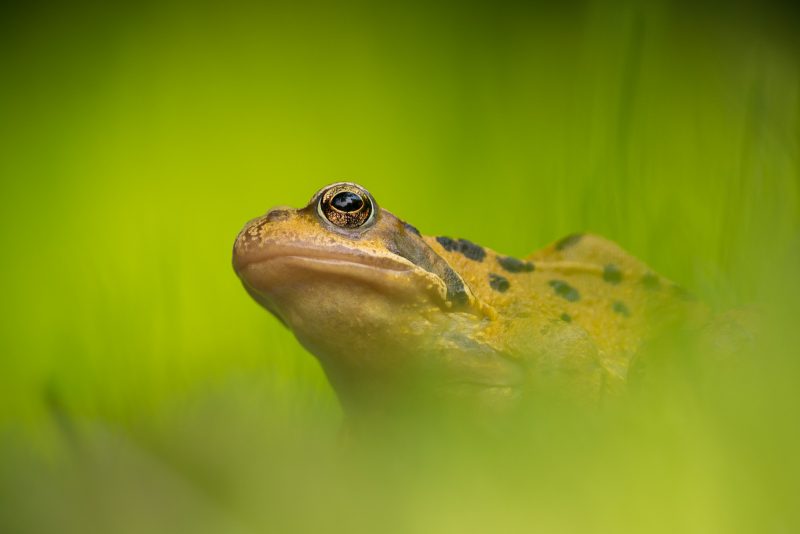
The breeding season is the best time to photograph these fascinating characters. Try kneeling by the water’s edge, camera ready, and wait for individuals – or even mating pairs – to poke their heads above the surface to breathe. During the height of breeding season, ponds can be noisy, lively places, with lots of frog activity.

Frogs look great out of the water too. Look amongst damp grasses close to the water’s edge. Low, eye-level viewpoints will often work best. Focus carefully on the amphibian’s eye and use a shallow zone of focus to throw surrounding vegetation cleanly out of focus.
Natural light is best. Avoid flash, as it can look unnatural and create ugly hotspots on the frog’s glossy skin. In poor light, increase ISO sensitivity to generate a usable shutter speed.
Read more: How to Photograph Frogs and Toads in Water
In conclusion
Hopefully, my suggestions will give you a taste of the subjects you can shoot with your macro lens this winter. However, once you start to embrace the season, you will soon find countless other miniature subjects to photograph close to home this wintertime!


