How to Photograph Panoramas

Believe it or not, taking panoramas is just about as old as photography itself. Early photographers, while struggling to show correct scale and detail in very wide scenes such as a city skyline or big landscape vista, began experimenting with shooting multiple images and placing them side by side to create one larger image.
This relatively crude process eventually gave rise to the design and development of a range of specialised panoramic cameras, even going as far back as the 1840s! As those first cameras needed to handle film anywhere between 5” and 16” wide and up to 20 feet in length, they had to be huge in comparison with the relatively modern film or digital SLR. It does make you wonder what photographers back then would have made of today’s weighty debates regarding Mirrorless vs DSLR.


I’m a big fan of taking panoramas and I very much enjoy the whole process, from camera through to print. In this article I’ll cover everything you need to learn how to take panorama photos, sharing my approach regarding camera technique, equipment and thoughts on composition, right through to software for stitching and post processing.
Definition of a panoramic image
The best definition I can give would be an image that is at least twice the width of its height, or vice versa depending on the orientation – an image that is at least 2:1 format or wider.
Generally speaking the 3:1 format, or thereabouts, tends to be thought of as the classic standard for panoramic images, but this is a throwback to film era cameras, most notable of these being the Hasselblad Xpan (24mm x 65mm or 2.7:1) and the Fuji 617 series (6cm x 17cm or 2.8:1).
It doesn’t really matter whether the image is shot with an ultra-wide lens, then cropped, or a series of images are taken, then stitched together. If the resulting image is 2:1 or wider then it can be classified as a panoramic image.
When should you take a panoramic photo?
I am of the opinion that you should always have a clearly defined subject, or set of subjects, and allow them to dictate the format of your image (rather than decide to shoot a panorama beforehand and make the subjects fit).
To illustrate what I mean, take a look at this scene that I captured in 2008 (not long after my first foray into panoramic photography).
You can clearly see the empty space top and bottom of the portrait shot, adding nothing of note to the image. I am not keen on cropping images (older cameras did not boast a large number of megapixels like modern cameras, and I also prefer to achieve my ideal composition in the field), and so instead took two shots at a focal length of 58mm.
To achieve the necessary “crop” of the composition, I then stitched the resulting images together. This meant I had created the square composition I wanted, and also at a larger than native file size.
Whilst these early examples are not a panoramic image, it was this process that made me begin to look at the landscape in formats other than the one my camera produced by default.
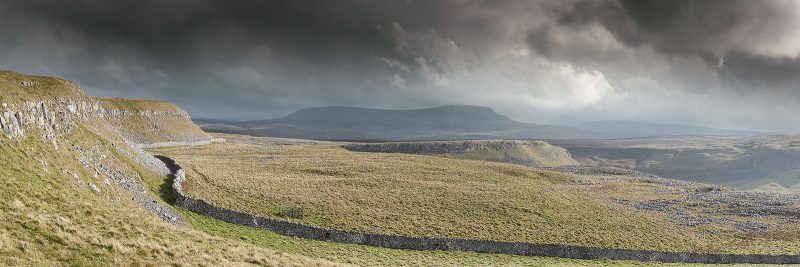
Around a similar time I’d also been struggling with another location, closer to home this time, in the Yorkshire Dales, UK. Crummackdale is an area I’ve visited and attempted to photograph on and off for probably the best part of twenty years. It has to be one of my favourite locations in the whole of the Dales, but not the easiest.
It’s a very pre-historic looking area of extensive limestone pavement and crags, with views to two of the Three Peaks of Ingleborough and Pen-y-ghent. Although the shapes of these hills, and Pen-y-ghent in particular, are photographically interesting, they don’t protrude very far from the surrounding landscape, and you would certainly never mistake them for mountains!
There’s also such a lot of open space between large areas of rolling fields and limestone pavement that it is very difficult to do justice to the grand scale of the area using just a wide-angle approach.
The answer is quite simple really. We need to be able to utilise the characteristics of two different lenses at the same time. Both ultra wide and telephoto. The ultra wide lens obviously allows us to compose the whole width of the scene, while the telephoto lens helps to compress distance and perspective, and in so doing increase the scale of background features that would be otherwise lost.
This is exactly the set of circumstances where the panoramic format can be the best approach. By using focal lengths of full frame equivalent 50mm and upward, it’s possible to compress perspective. Rotate the camera and lens, or use the shift movement on a tilt/shift lens, and the wide-angle aspect can be achieved.
Equipment for panoramic photography
You don’t need to break the bank with lots of expensive specialist equipment. Even though one or two items of kit will certainly simplify and make the whole process of shooting panoramic images more enjoyable, many of these are not absolutely necessary.
1. Tripod legs
If we stick with only the necessary kit to begin with, an obvious first item would be the tripod legs. Even the tripod itself doesn’t have to be anything special. However, it does need to be relatively sturdy and you do need to be able to level the base of the tripod where the head attaches. This is so that when you rotate the camera, it travels completely horizontally rather than rising or falling which would otherwise ruin the shot.
There’s a couple of ways to do this. Some tripods have a spirit level, usually on or attached to the base or casting of the tripod where the head attaches. By adjusting the length of the legs, you can use the spirit level to make sure the tripod is set dead level. If your tripod doesn’t have a spirit level on its base, it’s sometimes possible to use an inexpensive hot-shoe spirit level as long as there’s a flat area to put it.
The second method of levelling the tripod is quicker and easier, but requires the addition of a panoramic levelling base. The levelling base attaches between the tripod casting and the head, and allows us to level the base of the tripod head independently of the legs.
2. Tripod heads
The tripod head is another item that doesn’t have to be particularly specialised in any way. Similar to the tripod legs, it needs to be capable of holding your camera equipment both stable and vibration free.
The one essential requirement is for independent panning control. Some less expensive ball heads only have friction controls on the ball itself, meaning you can’t pan the camera accurately and these are probably best avoided.
The choice of ball or geared head is a personal one, and I use both with no difference in final results. If I had to express a preference, then I’d probably go with a geared head such as the Benro GD3WH or the Manfrotto 410 for their precise three axis control and value for money.
3. L bracket
One item I wouldn’t want to be without would be the L bracket which attaches your camera to the tripod head. The L bracket allows you to clamp the camera in either orientation without actually having to throw the tripod head over to one side to shoot in portrait.
The camera is positioned centrally on the tripod head, making it less likely to snag on anything while rotating, but having the camera centrally located can also slightly lessen the effects of distortion.
4. Tilt-shift lenses
Strictly speaking, tilt-shift lenses were developed for architecture and interior photography, however the features they provide can also come in very handy in some landscape situations.
Tilt-shift lenses, and especially at the wider focal length, allow you to introduce close foreground texture and detail back into your composition, which would otherwise be impossible with a conventional lens and stitching approach.
On a tilt-shift lens, the lens itself can be shifted or moved horizontally or vertically. The lens moves completely parallel to the camera’s sensor, therefore eliminating the need to rotate the camera, and with it the parallax distortion that this can cause.
If the camera is set up in landscape orientation, we can take three or four images shifting the lens between each one, and then stitch the resulting images together.
Personally, I would say the most useful focal length for this is 24mm (full-frame or equivalent). When shifted, this lens (Canon TS-E 24mm) gives an increased image circle approximately equivalent to a 14mm lens, allowing you to capture those very wide scenes while still retaining detail in the foreground.
Another handy feature is that the lens can be rotated 90 degrees so that it shifts vertically. A series of landscape orientation images can be shot while shifting the lens vertically between each one. When the resulting images are stitched together, they approximate to a 5:4 portrait format. You can also crop images to square and still have a larger filesize than the one native to your camera.
What is parallax distortion?
One of the limiting factors when shooting images to stitch together for a panoramic is the distortion which occurs when rotating the camera and lens. Elements at different distances within a scene do not line up quite the same in each image as you pan the camera, and this is known as parallax distortion.
As an easy way to demonstrate this effect, if you raise your index finger in front of your face and approximately 12” to 15” away, then intermittently close each eye while leaving the other open, you will see how the relationship between foreground and background changes as the angle of view changes from one eye to the other.
At longer focal lengths of full frame or equivalent 50mm and more, this distortion does not overly affect things, but at wider focal lengths it can cause problems with stitching software.
Panoramic heads and nodal rails
Nodal or panoramic heads, and nodal rails, are a solution to parallax distortion and permit the use of focal lengths wider than 50mm. They work by allowing you to place what is known as the lens’ nodal point right over the centre of the tripod and therefore eliminate the associated distortion when the camera and lens are rotated.
Although not totally essential for landscape work, a panoramic head does make the whole process more precise and enjoyable. Having an equally measured set of click stops for both pan and vertical camera positioning also makes it easier to produce multi-row panoramic images at enormous file sizes where necessary.
Finding the nodal point of a lens is relatively easy. Stick two straight objects such as poles or garden canes into the ground around 4-6 feet apart. Set up your camera on the nodal head or rail so that when you look through the lens, the poles align perfectly. As you pan the camera round the poles will separate with the effects of distortion. By adjusting the cameras position on the nodal rail, eventually you will be able to keep both poles aligned while panning.
There are usually a set of measurements etched onto the nodal rails. If you make a note of these measurements for each focal length that you plan to shoot, it becomes much quicker and easier to set up while on location.
Specialist panoramic heads can be quite expensive, so you should definitely make sure it is something you will actually use regularly enough to justify the cost. There are less expensive versions about, but in my experience the majority of these are too flimsy for anything other than a small compact.
Nodal Ninja and Really Right Stuff both manufacture quality models. I personally use the less expensive Nodal Ninja 5 – now replaced by the Nodal Ninja 6.
Nodal rails are not quite as versatile as a dedicated head, but they are very inexpensive in comparison, so these are maybe the place to start if you’re unsure how often you will put them into practice.
Composing panoramic images
There are obviously an infinite number of ways to compose an image. Your choices regarding composition can also be heavily influenced by fleeting elements such as light, clouds and varying weather patterns.
Rather than run through landscape compositional techniques, I think it makes much more sense to show a small selection of the types of composition that I seem to gravitate towards, while explaining why I made the decisions I did at the time of capture.
This is a favourite view at Malham in the Yorkshire Dales, UK. It’s quite a popular location with photographers, so it’s good to try and challenge yourself to find something a bit different.
The dry stone walls of Shorkley Hill are an obvious feature and have always captured my attention while passing by. The walls actually help to emphasise the contours of the hills and the intricate patterns they create are almost arterial in nature.
From my viewpoint on top of the hill, I wanted to try and include Malham Cove on the left, which would make the scene instantly recognisable, or to anyone familiar with the Dales at least. There was also an element of luck involved.
Although it was a late summer evening, the sun was still quite high and filtering through lower broken cloud, creating dark shadows in some areas. For probably just a few minutes dark shadow fell over the hill at top right, creating contrast and separation for the small barn in front, so I wanted to include this on the right.
In the foreground of the image I liked the repeating, undulating slopes, but also the tiny sheep which give a real indication as to the scale of everything else.
This was a series of ten images shot in portrait orientation, with a focal length of 70mm and 1/30 sec @f11 ISO 100. Slightly cropped, the image fits to the 3:1 panoramic aspect ratio.
This next image is a recent one from above Loch Leven in the Scottish Highlands. I liked the overall layout of the scene with Loch Leven running diagonally into the distance between the two peaks of Beinn na Caillich on the right and the Pap of Glencoe on the left. I could have probably cropped in a bit more from the left, but I also liked the way the Birch trees were highlighted by the encroaching mist.
The top of the image is simply defined by the highest peak on the left. I didn’t want to cut through this, if I had I’m not sure it would have looked quite right. Had I cropped in from the left, I would also have taken off more of the sky and the left hand peak, so the line of the mountains entered the frame diagonally from the upper left corner.
I think both of these variants would work, but I would have liked to see the whole reflection of the Pap of Glencoe. That’s maybe one for next time.
This image is a series of 8 frames shot in portrait orientation at a focal length of 90mm and 1/25 sec @f8 ISO 100. When slightly cropped the image fits to a 2.7:1 aspect ratio.
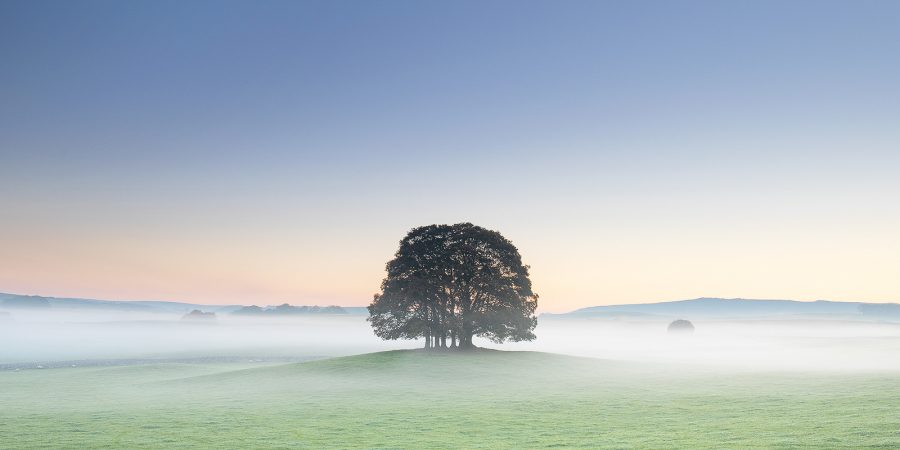
Just to show a slightly different approach, this next image was shot with a tilt-shift lens. The great thing about tilt shift lenses, or the wider versions anyway, is that you can begin to introduce very close foreground subjects back into your composition, and show real texture and detail.
The composition is quite a simple one. I liked the curving block of limestone in the central foreground, so this defined the bottom of the image. Giving the tree enough space to breathe on the top and the right defined those edges of the frame.
Finally, I didn’t want to cut off the point of limestone on the left, so this defined that edge of the frame. I have to confess, I originally shot and processed this image wider, but preferred the 2:1 aspect ratio for its better overall balance.
Shooting images to stitch into a panorama
The process for shooting images to stitch together is relatively straightforward.
1. Camera mode
I tend to favour manual mode for all landscape work anyway, but for panoramic images it’s essential to be able to lock the camera at a set exposure, and shooting manually is the simplest way to achieve this.
Light levels can vary from one side to the other in such a wide scene, so automatic mode would not be an option as the camera would adjust exposure with each shot, possibly complicating the blending process.
2. White balance
For the same reasons as above, it’s also best to lock down the white balance to one of the camera’s preset or custom settings, such as daylight/cloudy or degrees K. It’s not the end of the world if you forget to do this (and I often do), as you can obviously synchronise the white balance later (if shooting in raw).
3. Setting the exposure
When dealing with contrast, I still use neutral density graduated filters where possible, but I also bracket and exposure blend. My favoured method of metering for a panoramic photo is to take an exposure reading from an area that is approximately midway between the brightest and darkest areas of the scene.
For instance, if the right hand side of the image is nearer the sun, then this will likely be the brightest part of the image, whereas the left hand side will possibly be the darkest. Taking a reading from around the midway point of the area you intend to shoot will give the most balanced exposure.
After setting the exposure, you can pan the camera around checking the range of the scene on the exposure meter if necessary. You should obviously make sure not to blow out the highlights, or not so much so that they are out of range and cannot be pulled back.
Read more: The Essential Filters for Landscape Photographers

4. Shooting the overlap
As it’s likely that you will be using focal lengths anywhere between 50 and 200mm, camera shake can become a problem even on a tripod.
Using a remote release and mirror lock up (If using a DSLR) can help to combat this. Set up the tripod as described previously, so that the camera pans completely level. It is your choice whether to position the camera in landscape or portrait orientation, but I tend to favour portrait as it produces a larger filesize. This also means you can allow a little bit more space around your chosen composition in case of any distortion issues.
Although it will be dictated by your composition, you should try to avoid tilting the camera down on the foreground unnecessarily, as the smaller circle of rotation will result in more curvature at the bottom edge of your image which will have to be cropped away.
When shooting the images, overlap more rather than less. I tend to aim for at least a 50% overlap. The more anchor points for the stitching software to work with, the better job it will do.
Finally, just so you know where one series of images ends and another one begins when you view them on the computer, either overexpose a frame, or stick your hand in front of the lens after each set.
How to stitch and process a panorama
So, having taken all of our images, the very final step is to stitch them together and hopefully end up with a result that matches the composition we originally set out to produce.
There are many different softwares that you can use to stitch images together. Some of these are stand-alone stitching packages which give you a very fine degree of precise control, such as PTGui, whilst others have stitching tools included as part of a wider package, such as Adobe Photoshop and Photoshop Elements.
Stitching in Lightroom
In my opinion, probably the simplest to use of all these products is Adobe Lightroom Classic CC. Having imported your images into Lightroom, you can simply select them and use the Photomerge/Panorama feature located under the ‘photo’ drop-down menu to begin stitching them together.
Lightroom will then stitch together a preview image for you to check. Once you click the merge button, the high resolution images are stitched together and an entirely new DNG panorama file is created.
You can then use the develop module within Lightroom, as well as Photoshop, to further edit the new file. If you usually bracket images and blend them using HDR, Lightroom can also blend the images together and stitch them at the same time with its HDR panorama feature, which is found under the same drop-down menu.
In summary
To summarise what we’ve gone through in this article, here’s a checklist to follow:
- Use a solid tripod set up.
- Make sure the tripod is levelled so the camera pans completely horizontally.
- Use focal lengths of approximately 50mm (full frame equivalent or longer) to avoid distortion.
- Try nodal heads/rails and tilt-shift lenses for a wider, distortion free view.
- Consider your composition very carefully. Are you including visually interesting elements of the view; are these elements filling the frame without features that might distract?
- Shoot portrait images for a bigger filesize and to allow for some boundary distortion.
- Make sure to overlap images more, rather than less, for trouble free stitching.
- Most importantly of all… enjoy the process! It’s very rewarding, and especially once you get to see your results in print.


