How to Photograph Red Kites

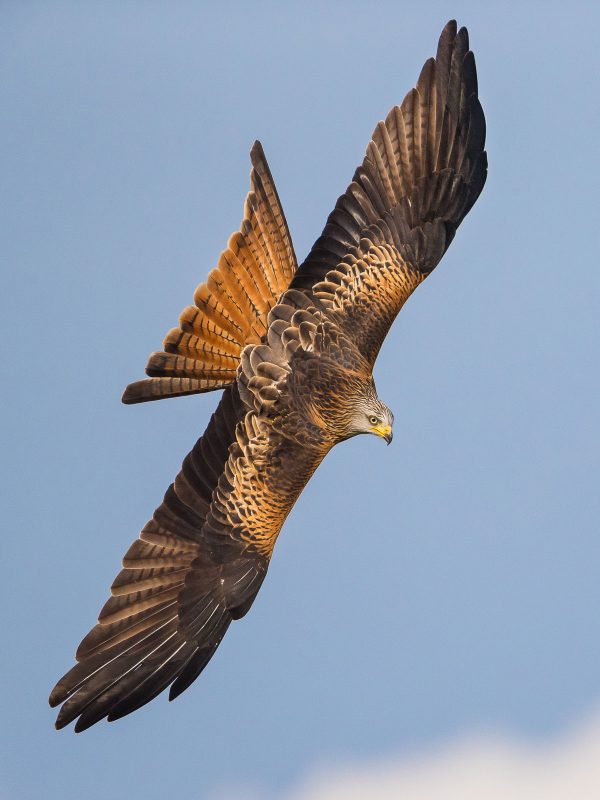
The red kite is such an iconic bird. It’s an unmissable and instantly recognisable shape. With its large, five-foot wingspan and delta shaped tail, it quietly and effortlessly hangs in the air, soaring across the countryside. It’s one of the most grand sights to behold, however not too long ago these beautiful creatures were pushed to the edge of extinction.


Back in the medieval era, the red kite was a welcome sight in the UK. It helped to keep the streets clean by scavenging on carrion. But, by the 1600s, red kites were so widespread they were labelled as vermin with farmers and gamekeepers eradicating many birds, mistakenly accusing them of killing their animals.
Fast forward to the mid-1800s and the birds had become a target of bounty hunters, taxidermists, and egg collectors. This brought about a series of events so damaging that the red kite was declared extinct in England and Scotland by the late 19th century, with only one breeding pair in Wales left during the 1930s.
A conservation movement was set up in the early 1900s to protect them and, towards the end of the 20th century, reintroduction programmes to Scotland and England helped populations increase across the UK. Now there are around 1,600 breeding pairs residing outside the stronghold of Wales, where some of the original descendants of that last breeding pair still remain.
Where to find red kites in the UK
While red kites are spreading out across the country, there are many feeding stations and areas where red kites are common. Take a look at some of the locations below:
- Argaty Red Kites – Dunblane, Scotland
- Galloway Kite Trail – Castle Douglas, Scotland
- Tollie Red Kites – Dingwall, Scotland
- Derwent Valley – Gateshead, England
- Chilterns AONB, High Wycombe, England
- Gigrin Farm – Rhayader, Wales
- Bwlch Nany y Arian – nr Aberystwyth, Wales
- The Black Mountain Feeding Station – Llanddeusant, Wales
Red kite feeding stations provide supplementary feed throughout the year to the birds. It is key for young birds’ survival through the winter months in particular.
The sight of a red kite swooping down to feed is a true spectacle that everyone should experience at least once. Get ready to be amazed and wowed by the aerial acrobatics performed by one of the finest raptors in Great Britain.
Many of these stations have specialist photography hides, allowing you to take in-flight shots of the birds swooping low to the ground. This means that there are good backgrounds, rather than bright white skies.
What to look out for
When you’re sat ready and waiting in the hides, make sure that you are paying attention for the feed turning up. It doesn’t take long for the kites to react, and once that meat is dropped across the ground the sky will fill with kites circling above.
Watch for the kites circling and, if you have good weather, being caught by sunlight as they bank around. Their feathers light up and those beautiful colours become evident.
Camera settings
1. Autofocus
For moving subjects such as red kites in flight, you’ll need a responsive autofocus setting. Switching the autofocus setting to a continuous focusing system (eg. AI Servo on Canon or AF-C on Nikon) is the key to capturing sharp, action-packed images.
Using continuous systems means that when the focus is activated (via half shutter press or holding down AF-ON if you are back button focusing), the system will power into life and remain focused on your subject for as long as it’s over your focus point.
It’s the best setting to use when you need to track a moving subject while shooting a sequence of action images on high speed drive mode. For red kite photography, change your AF zone size to match the subject of the bird for best results. I generally use the cross plus supporting zones (9 box grid). Sometimes, for diving shots where the birds move very quickly, I’ll expand this out a bit in case my own tracking speed can’t match the birds’ speed, so there’s some leeway in keeping it central.
Different moving subjects require a different autofocus approach, and that’s where Canon’s autofocus scenarios come into play. Navigating to the AF menu will reveal six auto focus preset modes to help you choose the correct setting the task.
For kites in flight, I’d opt for a mix of Case 3 or Case 5, but sometimes you may find they’re not working how you want them to. This could be that the focus system isn’t responsive enough for your subject, or for instance it’s not predicting the movement correctly.
By tapping the RATE button, you can tweak the three parameters to your hearts content to fine tune the variables to your subject’s movement.
2. Shutter speed
Out of the three main settings on any camera, the shutter speed has the biggest influence on how movement is portrayed in the final ‘look’ of moving subjects. For kites in flight which are just soaring around, you can get away with a slower shutter speed than what’s needed for when they’re diving.
For instance, I’d try to be somewhere in the region of a minimum of 1/2000th of a second to freeze the action. However, the faster the better if light and conditions allow.
Also, don’t be afraid to bump the ISO a little if it helps to get the desired results. There’s also good fun to be had by experimenting with slower shutter speeds to convey action through blurring backgrounds while the subject remains sharp. The key to this is tracking the subject really well so that you match its speed.
Read more: Panning Technique – Conveying Motion in a Photo
3. Aperture
I’d opt for an aperture a few stops down from wide open (around f/5.6-f/8) as the birds are quite large, and generally you’ll be shooting at distance. This will help you to ensure the entire bird is in focus, and give you a margin of error for those in-flight shots.
4. Focal length
Perfect focal lengths for most kite feeding stations would be between 300-500mm (on full frame), though longer means you can pick off the more distant birds against the landscape.
The benefit of a hide mean you can set up a tripod with gimbal for heavier prime lenses, though you’ll be surprised how quick you need to spin the camera around to follow the birds. Ultimately, in most cases, I end up handholding with a 500mm.
Wide-angles work well too and allow you to capture groups of birds, plus the seasonal landscape in front of you which does look lovely in autumn.
Acrobatics of red kites
After the early feeding frenzy tails off, there may be another wave of kites in smaller groups which makes picking out the odd bird much easier. These are far more leisurely in their approach to feeding and frequently float around the area for some time before taking their morsel of choice.
For sure, you’ll come away with some soaring kite images against blue skies too if you’re lucky, but the shots I always try to create are those split-second moments as the kite twists instantly into a dive. It will take many attempts (sometimes multiple visits), changing autofocus and tracking settings, but with enough patience and perseverance, you’ll bag a special shot that you can be proud of.
The main advice I’d give, as there are so many birds on display at feeding sites, is to choose one bird (without wing tags, preferably) and just follow it around. It may do a dozen circles or more but, sooner or later, it will dive for food, and you’ll be ready!
Throughout the session kite numbers will start to decrease but you’ll still get the odd group hanging around, with some perching up in the nearby trees. It’s always good to stay until the end as the longer the afternoon goes on, the more the light will improve. If you’re lucky, you’ll get golden light with moody skies. These are the conditions I always hope for and they make the orange and red plumage truly pop in the image.
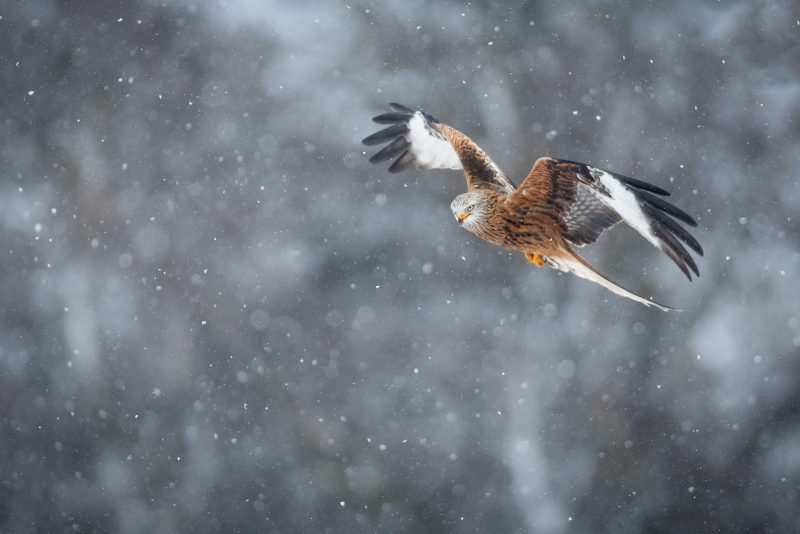
Visit in winter and, if you’re lucky, there will be snow on the landscape. Usually with birds in flight photos the undersides of the wings are always in shadow, however snow on the ground will act like a giant reflector and help to illuminate any shadows.
In conclusion
Red kites are one of the most stunning birds to photograph and they’re relatively easy to capture against the sky. Thanks to their large wingspan and slow soaring speed, it makes locking on with even the slowest of autofocus systems a breeze.
The real fun starts, however, when you want to freeze them in their mid-flight aerial acrobatics, as they dive and whirl over the landscape. I hope the tips and techniques above teach you understand your camera and autofocus more, and also go some way helping to create those action-packed images.


