How to Photograph Reptiles and Amphibians with Flash

After stepping into the world of wildlife photography, it quickly becomes apparent that the “perfect” conditions rarely present themselves. It could be the weather, difficult terrain, an animal’s unsightly pose (or often, its absence altogether), or a mix of all of the above. As a photographer looking for results, it’s important to do all you can to tip the balance of events in your favour.
This is especially true when the animals you pursue reside in testing environments. From sparsely lit rainforest floors and pitch-black caves, to shadow-filled desert plains and knee-high prairies, many of the habitats in which herps (amphibians and reptiles) call home feel like they were created to test a photographer’s patience.


Add into the equation the fact that many herps are nocturnal, and it’s easy to conclude that more often than not you’re going to need an artificial source of light to achieve favourable results.

In this tutorial, we’ll look at how to use flash to deal with low-light and nighttime conditions. We’ll discuss the gear you’ll need before setting out, and we’ll also see how to use diffused light to produce images where the subject pops – or to simply fill in shadows to prevent underexposed areas in your work.
For the sake of this tutorial, we will make the assumption that you understand the exposure triangle, composition and the set up of your camera with the right lens for the picture you have in mind. Therefore, the only thing holding you back is a lack of light, whether caused by a setting sun, heavy forest cover, or the fact it’s nighttime.

What gear do you need for flash photography?
The first thing is to ensure you have enough light. This will be for illuminating your subject or the surrounding area.
In some cases, like soft fill lighting when the subject is positioned right in front of your lens, the built-in flash on your camera may suffice. However, built-in flashes do have their limitations.
For those who want more control over lighting options, it’s best to invest in a more powerful external flash for your camera setup.

1. External flash
In reptile photography, you are often close to your subject and capable of dictating its proximity to the flash. This means even the weakest external flash units should do the job required.
This is because, for the most part, it is the freedom and positioning of the light that make an external flash unit beneficial, not the power it provides.
2. Flash trigger / flash cord
Check if your camera can wirelessly communicate with your external flash. If not, make sure you have a flash trigger or flash cord to connect the two.
While a trigger provides greater freedom, the choice between that and a cord comes down to your personal preference and comfort in the field.

3. Torch / headlamp
If you’re shooting at night, you’re going to need at least one light source, like a torch or headlamp, that gives you the ability to see what you’re doing.
In addition to this, try to have a second camera-independent light source which can remain focused on your subject. This constant light allows your camera to focus more quickly and, should the animal be potentially dangerous or likely to flee, helps you to keep sight of it.
4. Diffuser
Outside of your lens, flash and camera body, diffusers are arguably the most important piece of kit in a herp photography setup. A good one delivers smooth, consistent light which gives your image depth and appeal. A bad one gives your images hot spots and delivers a product which looks like it came from a point-and-shoot camera.
Types of diffuser to use
The type of diffuser you choose to use comes down to the composition and style you’re looking to achieve in your work. In general, these are two diffuser options I recommend for achieving a high-quality look to your amphibian and reptile photography.

When you’re starting out, it’s a good idea to remember that the more diffused the light is, the more pleasing the results will be. This principle dictates the thickness of the diffuser face and its size.
1. The DIY Softbox
The benefits of DIY softboxes are numerous. These camera-mounted setups stretch from above the front of your lens and usually anchor to near the hot shoe, creating a transparent wall to diffuse the light coming from your built-in flash or hot-shoe mounted flash.
This style of diffuser is an ideal starting place for photographers looking to dip their toes into herp photography. They are easily crafted from cheap packing materials, making them budget-friendly and lightweight – which is ideal for in-field shooting. And, perhaps most importantly, these diffusers produce stand-out results.

In addition, because these diffusers mount on the camera, they provide greater freedom than an off-camera option as your second hand is free to stabilise or adjust your camera settings, which may be preferable for some.
The exact design of your DIY softbox will depend on your camera body and whether you’re using an in-built or hot-shoe mounted external flash. The most important element is to create a wall, usually curved towards where the subject would be, to diffuse the light coming from your flash. It’s a good idea to add velcro or elastic braces to hold the diffuser in place when it’s mounted on the body.
2. Off-Camera Flash With a Softbox
The second option is fitting a diffuser to your external off-camera flash. This flash setup is extremely versatile in terms of light position and direction.
Up to a point, the bigger the softbox you attach to your flash, the better. However, it’s important to get the right balance and make sure it doesn’t inhibit your ability to hold the flash comfortably or prevent you from being able to place it close to your subject.

It is not uncommon for professional photographers to use multiple off-camera flashes and diffusers to further add to their control of the resulting scene.
Here are three off-camera flash diffusers that are well suited to herp photography:
It’s important to note that diffused lighting is comparable to art, and these suggestions should be seen as an introduction and not a definitive answer. Many photographers have spent years customising their personal lighting setups to achieve their signature look.
Settings and techniques for flash photography
When it comes to shooting with flash in the field, there are a number of things you should do to maximise your chances of success. While many principles of photography remain the same, the environment and conditions can often make things more difficult.

1. Practising at home
It’s a great idea to refine your flash photography in the comfort of your own home and become familiar with the technique required for your desired outcome. Find a small toy to use as your subject and play around with the angle and proximity of your lighting to get a feel for what works best and appeals to you most.
When shooting animals, it’s a good idea to face your light source slightly towards the direction of the animal’s head to ensure it is always well lit.
2. Shoot in raw
If you aren’t already shooting in raw format, now’s the time to start. Not only do raw images allow for greater post-processing manipulation if you aren’t fully happy with your exposure levels, contrast or other elements, but a further benefit is the ability to adjust the white balance.
When shooting, try using either the flash or sunlight white balance setting. But rest easy that when it comes to post processing your images, it’s easy to adjust the levels should they look “off” on screen.
Read more: Why You Should Be Shooting in Raw
3. Fill light
This obstacle usually occurs during the day when the sun is creating unwanted shadows in your scene or when the sun is setting, creating areas of light and dark. The aim of fill light is to lighten those dark areas in a natural and unnoticeable way.
In reptile and amphibian photography, this is often needed in the foreground of a wider scene. The objective is to make the scene feel like no additional light was used.

4. Complete general illumination
This approach is similar to fill light, except your scene is completely dark. In this case, you’re aiming to achieve complete illumination of both your subject and its surroundings.
This is often best achieved by positioning your flash just above the subject, ensuring it is the best lit element but still providing the surroundings with sufficient light.
5. Creating a black background
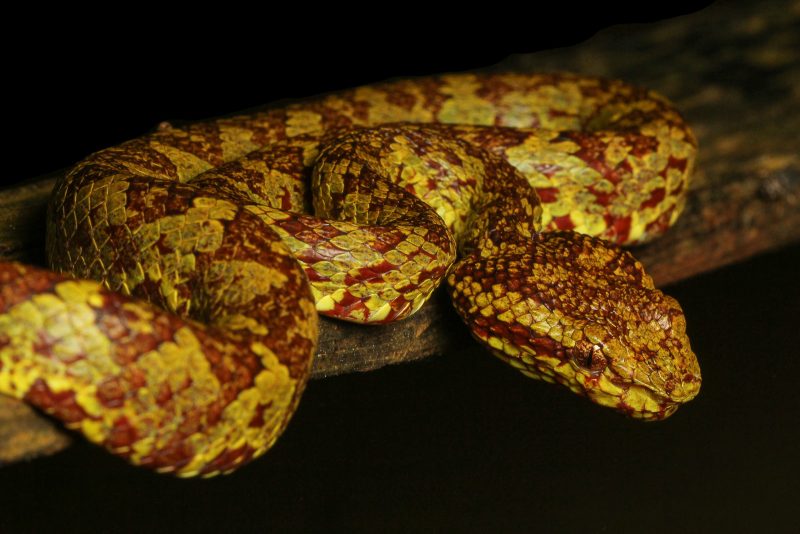
One of the most popular benefits of flash photography is presenting your herp on a black background. This allows the subject to pop from the screen and puts the focus on the animal. This attractive effect is achieved by shooting at eye level to your subject with light falling from an upward angle, casting very little or no light to the background.

Ethical considerations
While there may be no concrete and conclusive evidence (from scientific studies) that flash photography causes lasting damage to reptiles and amphibians, an educated guess would conclude that the experience is not a pleasant one for the animal. Like us, constantly having a bright light set off in your face is not enjoyable.
Read more: Does Flash Photography Harm Animals?
With this in mind, when shooting herps with flash, it’s always a good idea to err on the side of caution and use a common sense approach to ensure the animal is not harmed. If the animal shows signs of distress – stop.

In addition, it’s important to remember that while the flash may not affect the animal in the long term, it can still affect it in the short term. For example, it’s possible that repeated flashing may temporarily diminish the vision of herps and make them more susceptible to discovery and predation.
Additional note: You should never use a flash on nesting beach turtles. Bright lights are known to cause turtles to abandon their nesting attempts and to cause disorientation. Try long exposures and red lights if you want a nesting turtle shot.
In conclusion
Once you’ve found your preferred lighting setup and mastered the ability to create adequate, well-spread light for your subject or scene, the world of herp photography is truly your oyster.
There is no undisputed “right” answer to what makes the best lighting for snakes, frogs or lizards, and this means you’re free to take it on and find your own style. The methods mentioned in this tutorial are intended as a starting block to enable you to create your own artworks.
Finally, these lighting techniques, while ideal for amphibian and reptile photography, are also great for other smaller subjects, including insects and macro-sized matter.
Read more: A Guide to Using Flash with Wildlife


