
Joshua Tree Sunrise Photography Guide

Joshua Tree sunrise photography is a must for anyone visiting this great National Park in California. The park is a landscape photographer’s paradise, and never more so than during the magical sunrise hour, when the land is layered in hues of golden light.
In this article, I’ll cover some of the top spots to catch the Joshua Tree National Park sunrise, and how to make sure you get the most out of your shots.


I’ll share some of the easy mistakes to make and how to correct them, as well as advice that you will be able to apply to any future sunrise adventures beyond Joshua Tree!
Read more: Photography Guide to Joshua Tree National Park in California, USA
Where to photograph the sunrise in Joshua Tree National Park
There are some beautiful locations in Joshua Tree National Park that are perfect for sunrise photography and provide an interesting mix of potential subjects.
You’ll find exposed granite monoliths, rugged canyons, washes, playas, alluvial fans, and igneous and metamorphic rocks interacting with each other, all vying for your attention.
Amid the impressive granite boulder stacks, you’ll also find pinyon pines, California junipers, scrub oaks, Mojave yuccas, and prickly pear cacti – and, of course, the park’s namesake: Joshua Trees.

Some of my favorite locations for shooting the sunrise (featured in the images in this article) include:
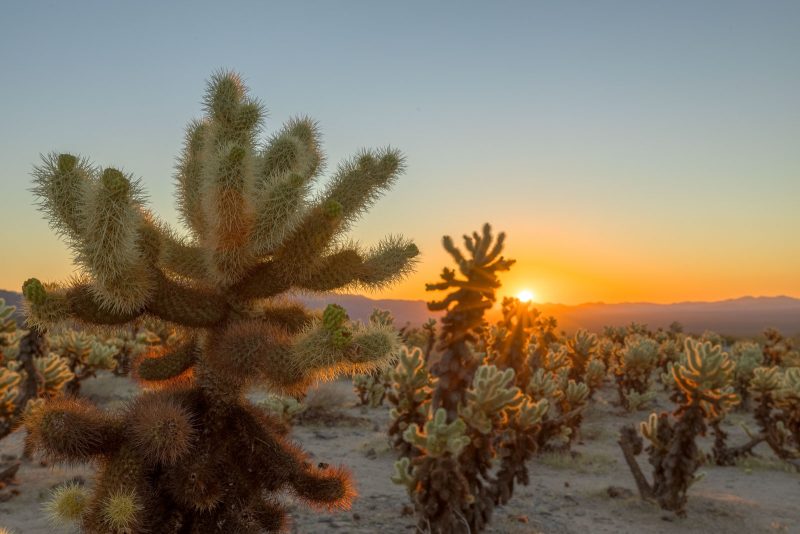
- The Cholla Cactus Garden
- Hidden Valley
- Quail Springs
- Sheep Pass
However, ultimately, there is no single best location to be in for sunrise photography at Joshua Tree, as all areas of this outstanding National Park can offer something different to your compositions.
There are always different photographs to be had, so I would also encourage you to go beyond these given locations and look for new spots to create new images!
Read more: Composition in Landscape Photography – The Essential Guide
Planning for sunrise shoots at Joshua Tree National Park
Once you’ve chosen a sunrise shooting spot, aim to get to your location before the end of nautical twilight, i.e., when it’s still dark. This gives you time to get set up and be ready to photograph during the pre-dawn light before the sun rises over the horizon.
I highly recommend using an app such as PhotoPills or The Photographer’s Ephemeris to look up twilight and sunrise timing at your location, as the timing varies throughout the year.
Assuming that your overnight accommodation is close to or inside the park (in one of the campsites), this will mean you must leave for your shooting location early.

These times range from at least 4:30 am from June to July in the height of the summer when the days are slightly longer, to 6:00 am from October to November when the days are slightly shorter.
Make sure to give yourself sufficient time to drive and hike to your chosen location in the park. It can be stressful to try and set up quickly while the best morning light comes and goes because you arrived too late!
As you’re going to be arriving at your location in the dark, it’s best to pre-plan your compositions in advance, for example, the day before your sunrise shoot.
Take photos using your phone to try out potential compositions and then ‘drop a pin’ on your digital map (for example, Gaia GPS) so you can retrace your steps in the dark.
Read more: 8 Ways to Improve Your Landscape Photography Workflow
Setting up at a sunrise location
If you arrive at your shooting location before the end of nautical twilight, it will still be dark, and you may need the help of a head torch to get set up. Use your digital map and pinned location that you set while scouting to position your tripod and mount your camera.
Always shoot with your camera mounted on a stable tripod. This gives you the maximum latitude in terms of shutter speed that you can use while using a low ISO and your preferred aperture (for depth of field).
To check your composition, increase your ISO until you can see the scene on the display on the back of your camera. Now fine-tune the composition until you’re happy with it.
Before shooting, don’t forget to reduce the ISO to the minimum you need to correctly expose your photograph – based on the aperture and shutter speed you select.
Remember that you may not be shooting directly towards the rising sun when scouting for a sunrise location. Always consider other potential compositions that may be in the opposite direction to the sun and/or to either side.
If you decide to shoot towards the sun, for example, because you want to capture a sunburst (achieved by setting your aperture to f/16 or smaller) as the sun rises above the horizon or a ridge line, do not stare directly at the sun to avoid eye damage.
Read more: How to Photograph into the Sun
How to photograph the sunrise
As the range of tones in your image is very likely to exceed the dynamic range of your camera (i.e., the maximum stops of light that your camera can capture in a single image), it’s a good idea to bracket your exposures.
This will help you to make sure you’ve captured all the tones from darkest to lightest in the scene. You can use those bracketed images in post-processing to maximize detail in both your shadows and highlights.
When shooting during morning twilight – whether away from the sun or towards it – you’ll typically need to bracket your exposures to ensure you can capture the complete dynamic range of the scene.

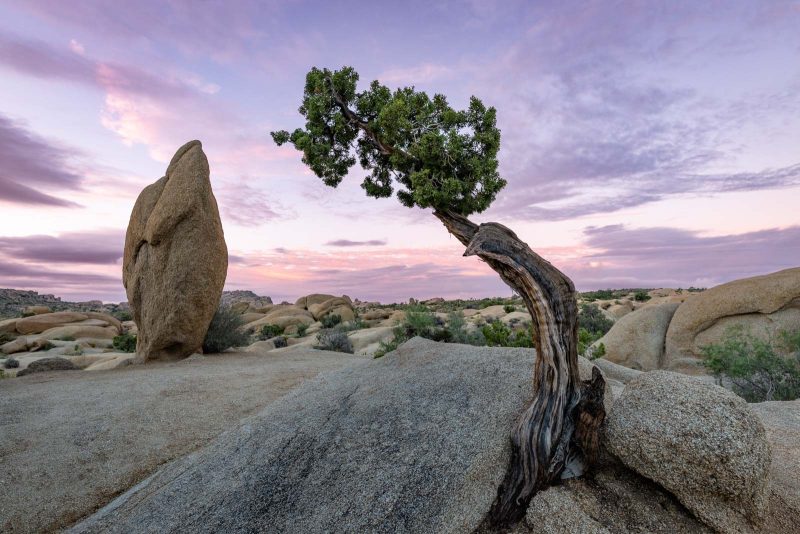
In the above image of the Belt of Venus (an atmospheric phenomenon visible shortly before sunrise during civil twilight, producing a pinkish glow) you wouldn’t be able to capture both the color gradient in the sky and the shadow detail of the Joshua Tree without bracketing exposures.
By bracketing exposures and shooting a series of 5 to 7 images at 1-stop intervals, and combining the images in post-processing, we are now able to see both of these elements in great detail.
Another suggestion, though not specific to sunrise photography, is to shoot two images (or a sequence of bracketed images) at each location – one horizontal and the other in a vertical orientation.
This gives you more choice when it comes to deciding how you want to use each image.

When shooting sunrise, start taking images at first light and don’t pack up your tripod and camera until full daylight arrives.
You never quite know when the color of the scene may peak, and it’s frustrating to pack everything up and then see the scene develop when it’s too late to shoot it.
Also, even though you’ve selected a specific composition, keep an eye out to your side and behind you, as sometimes you may see a better composition develop in a different direction.
If you do and have time to react, reposition your tripod, recompose, and take that shot instead (or as well).
Read more: Bracketing & HDR – Photographing Landscapes Without Filters
Why planning is important for sunrise photography
Sometimes it’s tempting to get up early and just try out a new trail and/or viewpoint from which to photograph sunrise. The next image is a good example of why that may not be a good idea.

You’ve hiked for 45 minutes from the trailhead, and it’s already approaching the end of nautical twilight as you can start to discern some foreground detail. You search for a composition, walking up and down the trail multiple times, but cannot find anything that works well.
In frustration, you set up your tripod and camera and take a few images – but none of them are well-composed or justify your early wake-up alarm!
So, make sure you’ve planned out your shots beforehand. This will reduce the chances of disappointment and hopefully guarantee a more successful sunrise shoot!
Read more: Golden Hour Photography – A Landscape Photographer’s Guide
Exposure settings for sunrise photography
While using a tripod gives you access to slower shutter speeds so that you can maintain a low ISO and your preferred aperture, be cautious when there is movement in your scene due to wind.

This image was shot with a shutter speed that was too slow to freeze the motion of the bush to the left of the tree – and consequently, the bush is not sharp in the image.
Be sure to review your images on the camera screen (with 10x magnification) before leaving the location so that if you need to, you can reshoot with a faster shutter speed to reduce or stop motion blur.
Read more: How to Master Exposure in Your Landscape Photography
Clouds make a sunrise
Clouds make for an interesting sky – both because they add visual interest to an otherwise empty sky but they also reflect the color of the sunrise before the sun is visible over the horizon. This effect can be particularly outstanding at Joshua Tree!

Dependent on the type and amount of clouds in the sky, plus other atmospheric conditions, you may experience very different colors during sunrise, from deep orange, light orange, and yellow, to lilac, pink, and purple.
In both the previous examples, taken toward the rising sun (while it was below the horizon), bracketing was used to include both the colors in the sky and the foreground shadow detail of the rocks and Dwarf Juniper tree.
Read more: Landscape Photography Settings for Cloudy Days
In conclusion
As a summary, here are the top tips to take away:
For standout sunrise photography at Joshua Tree National Park, remember these top tips to maximise your opportunities for great early-morning photography.
Head to the ‘well-known’ spots, but also don’t be shy about forming your own compositions in new, lesser-known spots.
Remember to pre-plan your compositions the day before to give you the best chance at a successful shoot, and get to your chosen spot while it’s still dark, giving you plenty of time to set up.
Don’t always forget to turn around and check the composition opportunities behind you, and try your hand at exposure bracketing to capture all the tones in the scene.
Don’t pack up your gear until full daylight arrives! You might miss the magic moment otherwise…
While sunrise photography will require you to set an early wake-up alarm, the resulting images are often better than those you can take at any other time of the day. So, before you venture out for your next sunrise shoot, do a little planning, set that alarm early, and enjoy the start of another wonderful day out in nature in this fantastic National Park.
Please remember to enjoy our wild lands and nature responsibly, follow local regulations, and adopt and practice the Nature First principles as you explore and photograph.


